问题
症状大概是这个样子:

解决办法
给当前设置 border 和 border-radius 属性的元素加:
overflow: auto;
...小于 1 分钟
症状大概是这个样子:
给当前设置 border 和 border-radius 属性的元素加:
overflow: auto;
主要使用了 ed25519 库
加解密和验证代码
// Common.js and ECMAScript Modules (ESM)
import * as ed from '@noble/ed25519';
// If you're using single file, use global variable instead: `window.nobleEd25519`

const verifyEd = async function (prikey, pubkey) {
    console.log("你输入的私钥是:" + prikey)
    console.log("环境变量中的公钥是:" + pubkey)

    // ====================
    // 新私钥开始
    // ====================
    // const newPrivateKey = ed.utils.randomPrivateKey();
    // const privateKeyStr = Buffer.from(newPrivateKey).toString('base64');
    // console.log("new privateKey=>", privateKeyStr)
    // ====================
    // 新私钥结束
    // ====================

    const privateKeyStr = prikey

    const privateKey = Buffer.from(privateKeyStr, 'base64');
    // console.log("parsed privateKey=>", privateKey)

    // ====================
    // 新公钥开始
    // ====================
    // const newPublicKey = await ed.getPublicKey(privateKey);
    // const publicKeyStr = Buffer.from(newPublicKey).toString('base64');
    // console.log("new publicKey=>", publicKeyStr)
    // ====================
    // 新公钥结束
    // ====================

    const publicKeyStr = pubkey

    const publicKey = Buffer.from(publicKeyStr, 'base64');
    // console.log("parsed publicKey=>", publicKey)

    try {
        const valiPass = "123456";
        const message = Uint8Array.from(valiPass, x => x.charCodeAt(0))
        // const messageStr = Buffer.from(message).toString('base64');
        // console.log("校验密码:", valiPass)

        const signature = await ed.sign(message, privateKey);
        const isValid = await ed.verify(signature, message, publicKey);
        // console.log("验证结果:", isValid ? "有效" : "无效")
        return isValid;
    } catch (e) {
        console.warn("校验失败,请检查密码", e)
        return false;
    }
}

const privateKeyStr = "prikey";
const publicKeyStr = "pubkey"
const valiResult = verifyEd(privateKeyStr, publicKeyStr)
valiResult.then(function(item){
    console.log("item=>", item)
})
代码如下:
// 敏感词过滤
var promiseAll = checkSenstiveWords();
promiseAll.then(function (results) {
	// console.log("results=>", results)
	// console.log("v1=>", results[0].flag);
	// console.log("v2=>", results[1].flag);
	// console.log("v3=>", results[2].flag);

	if(results[0].flag == true){
		Tip.fail({
			"text": msg["errors.sensitive.word.warn"]
				.replace("{0}", lang["kmsMultidoc.kmsMultidocKnowledge.docSubject"])
				.replace("{1}", '<span style="color:#cc0000">' + results[0].senWords + '</span>')
		});
		return ;
	}
	if (results[1].flag == true) {
		Tip.fail({
			"text": msg["errors.sensitive.word.warn"]
				.replace("{0}", lang["kmsMultidocKnowledge.fdDescription"])
				.replace("{1}", '<span style="color:#cc0000">' + results[1].senWords + '</span>')
		});
		return;
	}
	if (results[2].flag == true) {
		Tip.fail({
			"text": msg["errors.sensitive.word.warn"]
				.replace("{0}", lang["kmsMultidoc.kmsMultidocKnowledge.docContent"])
				.replace("{1}", '<span style="color:#cc0000">' + results[2].senWords + '</span>')
		});
		return;
	}

	// 校验成功
	// do something
}, function () {
	Tip.fail({"text" : lang['mui.return.failure']});
})
在任意目录新建一个插件目录,我这里在 /pkg/vuepress-plugin-simple-encrypt
mkdir /pkg/vuepress-plugin-simple-encrypt
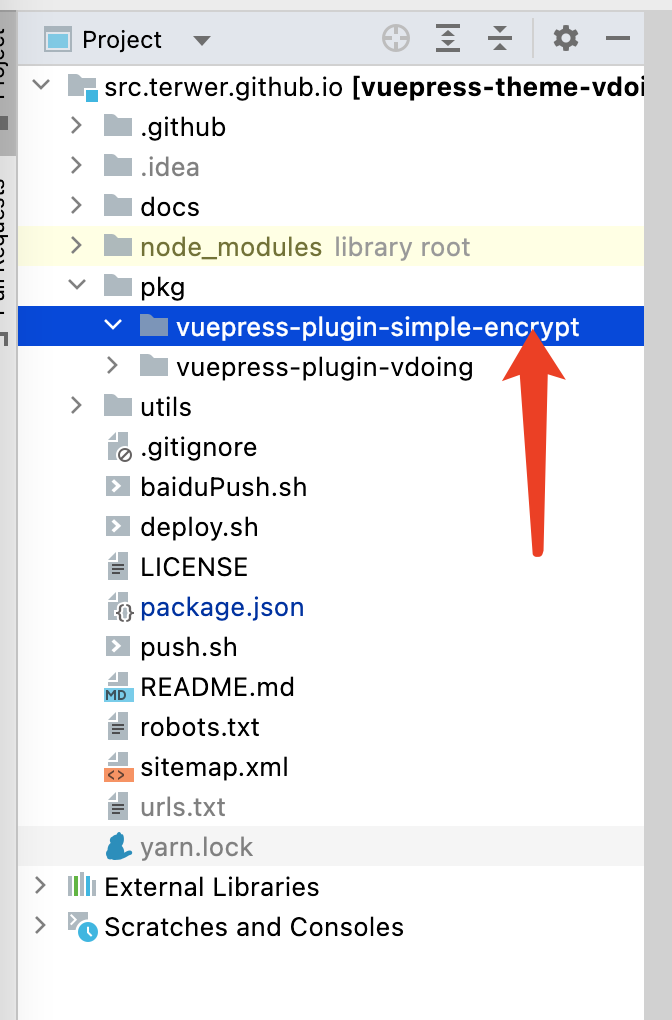
进入该目录,初始化项目
yarn init
输入插件名 vuepress-plugin-simple-encrypt ,入口文件名 index.js ,其他选项对应填写即可。
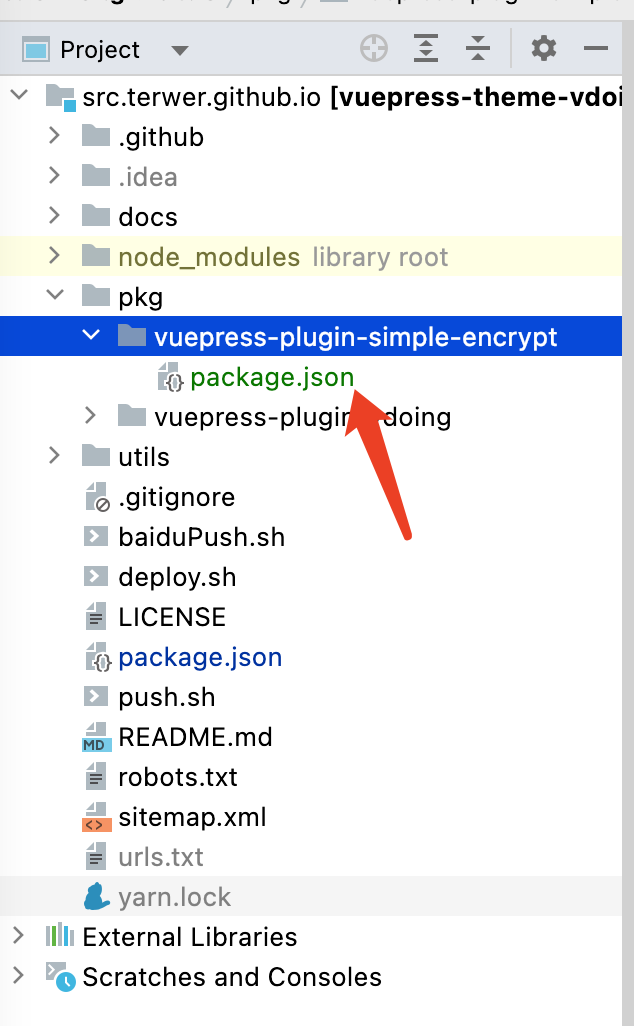
初始化之后,package.json 的文件内容:
{
  "name": "vuepress-plugin-simple-encrypt",
  "version": "1.0.0",
  "description": "a simple encrypt and decrypt for vuepress",
  "main": "index.js",
  "scripts": {
    "test": "yarn test"
  },
  "repository": {
    "type": "git",
    "url": "git+https://github.com/terwer/vuepress-plugin-simple-encrypt.git"
  },
  "keywords": [
    "encrypt",
    "decrypt",
    "vuepress"
  ],
  "author": "terwer",
  "license": "MIT",
  "bugs": {
    "url": "https://github.com/terwer/vuepress-plugin-simple-encrypt/issues"
  },
  "homepage": "https://github.com/terwer/vuepress-plugin-simple-encrypt#readme"
}
编写入口文件 index.js
module.exports = (options, ctx) => {
    return {
        name: 'vuepress-plugin-simple-encrypt',
        async ready() {
            console.log('Hello World!');
        }
    }
}
注入插件到 vuepress。在 config.ts 文件的插件节点加上我们的插件,注意使用相对目录目录
[
  require('../../pkg/vuepress-plugin-simple-encrypt'), // 主要用于文章部分加密
  {
  }
]
启动项目 yarn dev ,正常情况可以看到输出 Hello World
有的时候,当我们要使用额第三方库停止维护之后,我们想自己修改代码才能达到某个需求。但是 npm 默认是只读的,下次运行依赖管理会覆盖代码。
要在上面陈述的情况,我们可以把 npm 依赖库转换为本地依赖,这样就不再受包管理器约束,我们就可以自定义修改代码 了
先删除 npm 中依赖
yarn remove vuepress-plugin-comment
使用 require 传入相对路径,例如:
require('../../plugins/vuepress-plugin-vdoing-comment')
如果是 Vuepress 插件,可能需要下面的方式:
[
    // 使用本地插件
    // resolve(__dirname, '../../plugins/vdoing-comment'), // 评论
    // 使用npm仓库,待发布
    'vuepress-plugin-vdoing-comment', // 评论
    {
        choosen: 'artalk',
        options: {
            server: 'https://my-artalk-server',
            site: '站点名称',
            disableEmotion: false,
            disablePicture: true,
            disablePreview: false
        }
    }
],
当前端项目组件比较多的时候,引用组件会面临路径特别长的情况,不易维护且容易出错。定义绝对路径映射是个好办法,下面就介绍 Vite+TypeScript 的项目中中的具体实现。
vite.config.ts
resolve: {
    alias: {
        "~": path.resolve(path.dirname(fileURLToPath(import.meta.url)), "src"),
	}
}
tsconfig.json
{
  "compilerOptions": {
    "paths": {
      "~/*": ["./src/*"]
    }
}
yarn add @fortawesome/fontawesome-svg-core
yarn add @fortawesome/free-brands-svg-icons
yarn add @fortawesome/free-solid-svg-icons
yarn add @fortawesome/vue-fontawesome
chrome.runtime.onMessage.addListener((request, sender, sendResponse) => {
    switch (request.type) {
        case 'fetchChromeXmlrpc':
            (async () => {
                const response = await fetch(request.apiUrl, request.fetchCORSParams);
                const resText = await response.text()
                // console.log("chrome.runtime.onMessage.addListener fetchChromeXmlrpc response:", resText)
                sendResponse(resText);
            })();
            break;
        case 'fetchChromeJson':
            (async () => {
                const response = await fetch(request.apiUrl, request.fetchCORSOptions);
                const resJson = await response.json()
                console.log("chrome.runtime.onMessage.addListener fetchChromeJson response:", resJson)
                sendResponse(resJson);
            })();
            break;
        // 你可以定义任意内容,使用sendResponse()来返回它
        case 'test':
            sendResponse({'msg': 'test'});
            break;
    }

    return true; // keep the messaging channel open for sendResponse
});
字体格式有太多选择,不幸的是始终 没有一个能在所有的浏览器上通用 。这意味着,你必须使用多种字体的方案来保持 用户跨平台的一致性体验 。本文内容如题,会依次介绍一下 TTF、OTF、WOFF、EOT 和 SVG 几种字体目前在 Web 上的情况。
@Font-face 目前浏览器的兼容性: